Tuesday, November 16, 2010

Tomato attack


An early frost in November caught us mostly by surprise.

We managed to cover the tomato plants, but it was a very hard freeze (29.1 deg F by our digital therm) and still managed to kill off the plants. But covering them did save the fruit that was on them.

After a long afternoon of harvesting we have over 20-25 pounds of tomatoes! A large variety and all heirlooms. Mostly they are un-ripe but some are heirloom green ones and others are ripening as this is written. There are some peppers mixed in as well.

Most will probably be made into wine and any ripe ones will be savored and turned into sauce or sliced.

Monday, October 18, 2010

More garden pictures


The garden is still going strong in mid October.

The corn is all done though and most has been cleared out. The zucchini are still producing like crazy and the tomato hedge is still going well and putting on a lot of tomatoes.

One watermelon vine is still hanging on and has a few melons on it that are still getting bigger. The variety is Stars and Moons and I am pretty sure it is not a good variety for such heat as that stunted the growth of the vines. Now that it is cooler the vine seems to be doing better but not putting on any growth other than the melons.

There are a TON of tomatoes in the hedge and the images do a poor job of showing them. But there are a ton hidden around inside the hedge. Most are still green but some are turning.

The pumpkin plants are doing well and starting to flower so that should be good for some pumpkins around Thanksgiving time.

The Ancho Gigantica peppers are doing very very well being partially shaded by the tomato hedge. I think giving them full sun in (failed) years past is what led to crispy pepper plants.

Thursday, September 9, 2010

Late summer garden


This year instead of planting in the spring and trying to keep plants alive through the long hot months of May, June and possibly July we instead planted with the monsoons in mid July.

It turned out to be much better than trying to shade the quickly crisping tomatoes and corn and pumping a ton of water everyday to keep them alive. Some crops that we have 'crisped' to death in previous years are tomatoes, peas, beans, a variety of peppers, corn, watermelon and probably a whole lot of others I am forgetting.

So now everything is starting to produce and looking quite healthy! Zucchini are already becoming a regular with each meal! As usual the method employed with the tomatoes is my usual 'super shrub' where a whole lot of plants are grown together to provide a large hedge of tomatoes for self support and shade.

We have Hopi corn (the short ones), Golden bantam (white man corn), Ancho peppers, golden zucchini, Moon and Stars watermelon, and a huge variety of Tomatoes. Pumpkins are also planted as usual and should hopefully be ready for Halloween if not Thanksgiving.


Thursday, June 24, 2010

Bee progress


Multi-use comb
Originally uploaded by Beaver w/ a Toothbrush

We opened the hive to check the bees' progress a few weeks ago.

The main thing we were looking for was brood. If there wasn't any brood then the hive would die out.

We were happy to find quite a bit of brood. At least two of the forms are shown in this picture: larva and capped brood.

The center of the picture shows capped brood. This is the oldest brood. The bees in them are in the pupa stage and will be the first to emerge.

The next oldest surround the center. They are in the larva stage and look small worms coiled inside the cells.

There are probably also eggs in some of the cells but they are hard to see because they are so small.

The empty holes in the capped area may be from bees that have already emerged. If they have, the nursery bees will clean out the cells so the queen can lay new eggs in them.

In the upper left corner of this picture there is capped honey. Honey cells that haven't been capped yet are below that.

Mature bees that are halfway in some of the cells could be feeding larvae, storing pollen or honey, taking pollen or honey, or cleaning the cell.

New comb

These pictures were taken about two and half weeks after we put the bees in the new hive. They built up all the comb on multiple frames and were raising a big batch of brood.

Monday, May 24, 2010

Trapped snake


Trapped snake
Originally uploaded by Beaver w/ a Toothbrush

Our well pump stopped working again a few weeks ago. When we set out in the morning to try and figure out what was wrong I noticed this snake when I was walking back to the house from the shed.

She was caught under the south side of the mobile. I thought she might be dead but I gave her a bit of a poke with a stick and she moved slightly.

We took a break from well fixing and dug out around her to try and see where she was caught. The mobile has chicken wire buried around it and while there are plenty of spots where it's completely rusted and gone, the snake had tried to go out through an intact piece.

As we dug she pulled her head out and gave us an annoyed look. We were a little worried about what kind of snake she might be but when we saw her head and she unwound a bit, it was clear she was a gopher snake.


That made us want to save her all the more. We have plenty of gophers around that we'd like be rid of. Husband got some gloves and gripped her head while I got around her with wire cutters and tried to cut the chicken wire away.

I thought I had freed her so husband let her go but it was no good. We shaded her with some scrap wood and went to work on the well again to give her a break.

We came back later and Husband grabbed her again. I got braver and really got in there to see what was going on. I found that she had wedged herself into one of the pieces of wire. I could barely get the wire cutters between her and the wire. When I finally cut the right piece though it was obvious. She started backing out right away.

Husband let her go and she reversed under the mobile and was gone.

Monday, May 3, 2010

Newbees


Newbees
Originally uploaded by Beaver w/ a Toothbrush

The package bees my mom got for Husband's birthday a couple months ago shipped from Illinois last Tuesday.

My mom called on Friday morning. The UPS guy had called her and he was on his way with the bees. Husband hurried out the door.

The bees were in this screened crate but also inside another box. When husband got there he took them out of the box and sprayed them down with sugar water. The sugar water gives them something to eat and makes them less flighty. It also helps cool them down.


Sugar-water shower

He put them in the passenger seat of the truck and drove up. When he got back home, I grabbed the camera and we went to work setting them up in their new home.

We took the cover of the hive and sprayed them thoroughly with sugar water again. Then we took out the can that had provided them with sugar water during shipping. Once the can was out, husband pried out the staples holding the queen cage to the crate.


Queen cage removal

We made a hole in the candy plug on the queen's cage so the other bees could slowly free her and at the same time become accustomed to her. Then we suspended her cage in the hive.

After the queen cage was out, I took the opportunity to take some pictures inside the crate. It contained about three pounds of bees - about 9000!


Package interior

The way to get the bees into the hive is easy in theory. You just remove a few frames from the hive and shake the package over the hole. You might whack the side of the package a bit to get more of them out.


Freein' bees

It's a little more difficult than it sounds. As soon as the first bunch falls in, there are bees flying around everywhere. They land on everything (including our now sugar-covered hands) and make it hard to hold or whack the package while still avoiding whacking a bee.


Shakin' bees

Once husband and I swapped places though we got most of them out. I'd hold the package really securely and he'd really whack the side of it. That would cause most of the bees to fall to the other side of the package. Then I'd tip the package the other way, and they'd roll in a beeball out the hole.

We took breaks from time to time to spray the flying bees down with sugar water. The wind was blowing so by this time my camera had a fine spray of sugar covering it. The pictures started getting a little blurry.

After most of the bees were out of the package it was just a matter of sliding the frames back in without squishing anybee.


Replacing frames

Then we carefully replace the screen hive topper and the lid. We left the package next to the hive so any stragglers could find their way in later.


Bee install complete

Wednesday, April 21, 2010

Well repair

hus and well
Last month I went to take a shower one Tuesday night and we lost water pressure in the house. I wasn't worried about it at the time because we mysteriously lose pressure from time to time.

We tried to get the water pressure back Wednesday morning in the usual way. Turn the switch until the pump comes on and wait for the pressure tank to fill. The switch came on, we heard the pump going, but after 5-10 minutes the tank still wasn't full. We went inside to research what might be causing the failure. We also got out the stored water jugs to satisfy our baseline water needs.

There are five main parts that could malfunction: the pressure tank, the pressure switch, the pump, the pump switch, and the pipes. We had recently replaced the pressure tank so ruled that out to start with. The pressure switch and pump both seemed to be working but we couldn't tell for sure. It seemed like the only choice was to pull the pump, inspect the pipes, and hope we found an obvious problem. By this time it was too late Wednesday to pull the pump. Day 1: no water.

Thursday morning we devised a plan and got ready to pull the pump. The pump was attached to a steel cable that goes over a pulley and connects to a hand or drill powered winch.

winch
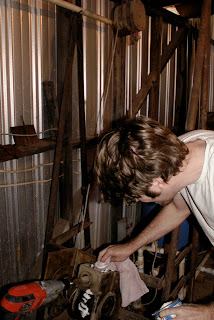
Husband greases the winch with some old crisco.

first length of pipe
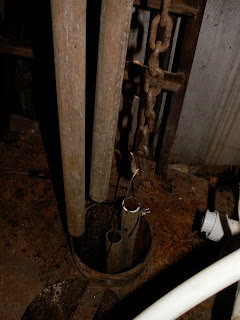
Looking down the well after we've raised the pump the first 6 feet.

Our choices for raising the pump were either to take the roof above the well off to let the steel pipe go through or cut the pipe every 6 feet once it reached the ceiling. We tried taking the roof apart but the last owners had glued huge sheets of shingles with tar up there so we went with cutting the pipe.

We cut the first length with our trusty generic sawzall (possibly the most destructive and useful tool we own). We didn't have to worry about the remaining pipe falling because it was connected to the pump, which was supported by the steel cable. So we kept at it. Pull the pipe up 6 feet, cut it, repeat.

The first few sections of pipe were relatively clean because they were above the water line.

dirty pipe
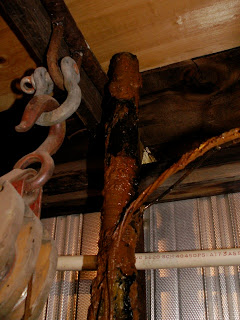
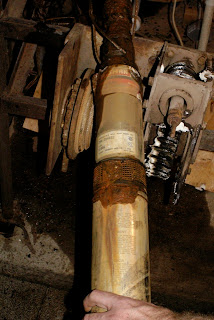
Pipe from below the water line.

The pipe from below the water line was shocking at first. This is the point where we started getting filthy. We kept raising and cutting the pipe hoping to find some kind of damage. Since we decided to cut the pipe as we raised the pump we planned on replacing it anyway so finding some damage would have been great. If the pipe was damaged that might mean we didn't have to replace the pump.

water spray
Yes! A hole in the pipe!

Finally, after we had pulled about 40 feet of pipe, we found a hole. If we're lucky, this might be the only thing keeping us from getting water pressure.

pipe perspective
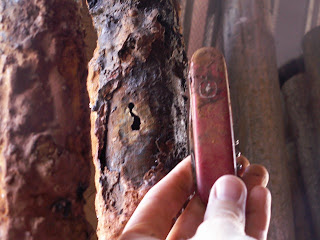
The hole compared to a Swiss army knife. I apologize for the grimy knife. My hands are still surprisingly clean at this point because my thick gloves have yet to be saturated with corrosion.

We still had a few more sections of pipe to cut at this point but we eventually made it down to the pump. We had to pull it all the way out to see what kind of connection to get when we replaced the pipe.

Submersible pump
Our pump, a submersible Craftsman, looks pretty good. Yay!

We detached the pump, made our careful shopping list, and headed into town. The list: 100' 1" PEX pipe & clamps, PEX crimp tool ($40!) , PEX to PVC fittings, PVC backflow valve & disconnecting coupler. We went with PEX, a semi-flexible plastic pipe, so we wouldn't have to cut the pipe the next time we wanted to raise the pump. We also got a screw-type coupling for the PVC so we wouldn't have to cut it either. Both of these turned out to be good choices but more on that later.

old pipe stack
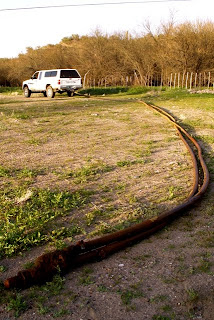
The old pipe. About 60' total.

We hit the store and ran some other errands while we were in town. We made it back by about 10:00 p.m. Husband really wanted to try to get it all put back together that night so he could take a shower. I was not so keen but didn't want him to do it alone so off we went.

We attached the pump to the PEX, taped the wires to it as best we could and lowered it all back down. It didn't go down quite as smoothly as it came up because the PEX wouldn't unwind completely straight. The perpetual bend caused the pump to scrape the sides of the casing and hit the remaining old pipes as it went down. Husband did his best to keep it going in straight as I operated the winch.

We finally got it all connected and down about midnight. But to our dismay, when we hit the switch there was nothing. Complete silence. We gave up and went to bed. Day 2: no water.

Friday. We tried turning everything on again in case we had made some stupid mistake the night before. No good. We had no choice but to pull the pump again and see if we could figure out what the problem was.

We pulled the pump and looped the PEX around the shop as best we could. This is already a long story so I'll make this part short: we found some places were the wires were damaged and decided to replace the wires. We went back into town, bought what we needed, and came back that night. It was only about 8:00 p.m. but we were already tired and we had other work to do (the kind that pays) so we called it a night. Day 3: no water.

Saturday. Well, we thought, since we've gone to all this trouble why not pull out those other old pipes while we're at it? They might have contributed to our pump scraping as it was lowered and damaged the previous wiring.

The problem was, these pipes were from an old jet pump that was mounted on the surface. The only thing holding them up was the plate they rested on at the top of the well. We couldn't just lift and cut them like the other pipe.

Here's where I devised an ingenious solution. The plan was: we pull the pipes, attach them to the pulley above, drill holes in the pipes, lace steel cable through the holes, attach the steel cable to the pulley above, then cut the pipes above the cable.

This plan mostly worked. I almost ruined it by trying to change the plan mid-execution but luckily we found some extra chains, straps, and hooks around the shop and in the truck and we able to salvage it.

ingenious idea
Removing the second set of old pipes.

This was the only part of the entire adventure that got a little scary. If we dropped the remaining pipes down the well that would be near disaster. Every time we moved something we put a backup on it in case it fell while we were moving it. The cable, chain, hook, pulley management was chaotic.

tangle
The tangle. The green strap is holding the pipes that were just cut. The chain is connected to the steel cable holding the pipes that are still hanging in the well. The backup on the lower pipes isn't in place yet.

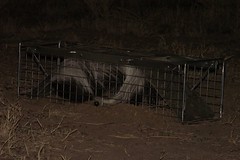
At this point, we took a break to help our neighbor find his dog. Charlie the chihuahua had chased a cat into the forest. We tromped around the forest for a half an hour and returned to find that Charlie had found his way back home. That was probably a good break to blow off some steam. Now back to work.

Taking these pipes out was difficult because they were connected at the bottom. They appeared to be flexible beyond a certain point but we couldn't tell for sure. We did the drill, hang, cut, lift routine a few more times and got the flexible part within a foot or two of the well opening.

Then Husband came up with a new ingenious plan: attach the pipes to truck and pull them out the rest of the way. We set up an elaborate strap system. The come-along winch was holding the pipes up and was attached to a post in the shop. We attached the pipes to a strap, to a chain, to the truck.

I got in and drove as slowly as I could while Husband shouted from the shop. It worked! The rest of the pipes came out rather easily.

truck pull
About 40' of pipe from the old jet pump.

With the old pipes removed, we were ready to rewire, test, and lower the pump again.
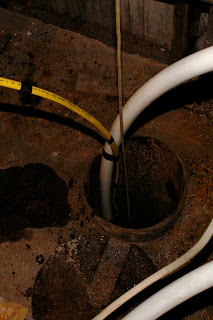
empty casing
Empty well casing.

We rewired the pump and decided we'd better test it at ground level. We didn't want to use much water because we had a limited number of water jugs so we lined a half steel barrel with a tarp and partially filled it with water. We submerged the pump and hit the switch.

pump test
The pump test.

And it worked! The pump fired up and we danced and celebrated (sorry no pictures of this, we were really seriously dirty at this point).

We lowered the pump once more.

pump going down

Day 4: running water and hot showers restored!

And we lived happily ever.

Tuesday, April 6, 2010

Orchard news


Apple blossoms
Originally uploaded by Beaver w/ a Toothbrush

We have yet to get our garden planted but that's why we were extra sure to plant some fruit trees last year.

Yay, fruit trees! You don't have to plant them every year.

This apple and a peach are blooming. The other apple, peach, and nectarines are all leafing out.

Thursday, April 1, 2010

Wildflowers


Wildflowers
Originally uploaded by Beaver w/ a Toothbrush

I've been meaning to post about our recent well fix but since it's a long story I've been putting it off.

In the meantime, February showers brought March flowers. There are wildflowers everywhere. Even from across the valley some of the hills look yellow.

California poppies carpet the slopes and lupine run along the roads.

Sunday, February 21, 2010

Kitty 4!

stray tabby

We came home pretty late Friday after a day in town helping family repair a rental house.

As we pulled into the drive I saw a kitty walking in the neighbor's yard. I had seen him once earlier in the week along the road and thought maybe somebody had a new cat.

The kitty stopped in the neighbor's yard and looked back at me when I got out of the car to open the gate. I said, "Hi Kitty," and as husband was pulling in, the kitty came trotting over.

I gave him a little pet and picked him up since he seemed friendly. He didn't mind being held at all. Then my heart melted when he started hugging me.

I've never met a hugging cat before but that's what this little guy does. He rubs his face along your jaw and puts one leg on either side of your neck before resting his chin on your shoulder. I almost get misty eyed remembering how sweet it is.

He seemed skinny when I first picked him up but not starving. I put out some food and he scarfed it up. I didn't let him into the yard because I didn't want to trap him there.

I set him up with a piece of scrap fleece to sleep on in the little red trailer so he'd be off the ground. I put food and water nearby. I went inside thinking maybe we'd adopt him as a barn cat.

I went out in the morning. He hadn't left in the night. He had discovered a way into the yard and was sleeping under the tractor. He ran right over and followed me around as I did some chores.

I discovered that he was quite skinny and had some mysterious shaved-looking patches here and there. It looks like he may have taken to sleeping in engines and gotten a few close calls.

I would have been content to keep him as an outdoor cat but even more than food he loves to cuddle. He doesn't want to be an outside cat unless we're also outside. I spent a while outside with him but it's been raining and cold.

Husband finally convinced me to set him up in the back bedroom and let the other cats get accustomed to his smell. After a day or two maybe we'll try a furface to furface introduction.

So here I sit in the back bedroom. On a blanket on the floor. Little huggy kitty mostly sleeps against my legs when he's not purring and climbing on me.

Sunday, January 31, 2010

Mighty green things

Apricot tree sprout

I can hardly believe I only planted this apricot tree 2 weeks ago. This is the same tree that's in the last post.

Husband has been working on getting rid of an old circular horse-training type thing. He's dismantling it since we don't have any plans to get horses and we can reuse the railroad ties in other projects. We've had a lot of rain lately so it was a good time to get the railroad ties out. He had the idea to strap them to the bucket of the tractor with a chain and pull them out. I was a little wary of this plan but it mostly worked quite well.


Sunday, January 17, 2010

Work day

Girl on Trailer

Today we did some work around the Hovel. We took a few loads of junk from the west end of the property to the junk area. We still need to sort through it but at least it will all be in one spot. Part of the fun of cleaning up is riding around on the mini-trailer.

We also sunk a railroad tie and hung a new gate. This is part of the work that needed to be done to move the garden up near the house. We have to fence the entire yard to keep javelina out. Since the fence will also enclose our porch, we're putting in a few gates so we don't have to jump the fences all the time. The fence is only 2.5 feet tall but that's just tall enough to catch pant legs and cause trips and falls. I'll save someone some embarrassment and not tell the story about the trip over the garden fence, the subsequent fall, and the resulting roll in fresh doggie turds.


Lovely Miss Wildflowerhouse gave us some apricot sprouts from fruit off one of her trees. I've always wanted to try growing a tree from a seed but so many of them need to be grafted. These are supposed to "come true."

Saturday, January 16, 2010

Skunk catch and release program


Caught a skunk
Originally uploaded by Beaver w/ a Toothbrush


2010 came in with a stink. I was awoken in the middle of the night by a strong skunk smell a couple weeks ago. I got up and sniffed around the house but couldn't find the source of the smell so I tucked my nose under the covers and went back to sleep.

We investigated the next day and found a hole where a skunk probably got under our house. I immediately started searching forums and found some suggestions for getting skunks out from under the house.

That night we sprinkled DE around the three holes we had found and waited for nightfall. When we checked later we found that all three holes had tracks. We couldn't make out what the tracks might be. Since each hole was vacated we piled rocks and other rubble into them and went back inside.

Around 8:00 we heard a mad chattering sound and went outside to check. One of the holes was open again. We figured we'd try again the next day and didn't think much more about it.

We woke in the middle of the night to more mad chattering and wafting smells. We traced the smell to the middle bathroom and when I opened the cabinet and looked under the smell was intense and terrible. Skunk smell is an amazing thing. When you start to get used to it, it seems to magically change so that you can smell it again. It smells like terrible BO and rotten onions among other disgusting aromas.

We think the skunks that had previously been living in separate holes were forced into the same hole and fought under the house. One of them sprayed. I spent the next half hour taping trash bags over the cabinet so no air could come up from under the house. I put out coffee beans, lit candles, sprayed Ozium and other air fresheners, and sprinkled peppermint oil on cotton balls for our night stands. Just thinking about the smell makes me slightly sick.

Husband tried to sit out in the dark for a few nights and actually see one come out from under the house but it didn't work. It was too dark and the skunks would somehow sneak past him or wait for the moment he came inside to warm up and then escape.

We finally bought a trap. We didn't catch anything the first night. The second night, when we came back from a trip we found a skunk in the trap. We were very wary and careful but the traps are made so that the skunk can't lift its tail and we didn't have any problems.

We thought we might be done but each night the rocks we put over the holes continued to be moved. We left the trap out and baited and finally caught another skunk last night.

This time we were less freaked out so I took the opportunity to take a couple quick pics. After we find a skunk in the trap we toss a blanket over the cage and put it in the back of the truck. Then we drive 7 miles up the road to a turn off far from where anyone lives and set the trap near the forest edge.

Then husband uses a stick with a hook on it to lift the cage door locks on either side. We never catch a skunk before complete dark so he holds a flashlight and scolds me to aim mine in the right direction. (I'm an easily distracted flashlight holder and my light's always swinging this way or that).

After the door locks are up, he puts the hook in the door latch and puts a rock on it to hold it in place so we can be far away when the stunk gets out.


Skunk release

The first skunk we released went into the forest right away and didn't look back at us. This one just sat in the cage. First we sat in the truck for a few minutes with the lights off to see if he was just too scared to leave. That didn't work. I got a piece of lumber from the back of the truck and tried gently pushing him from the front and the back but he just wouldn't budge.

Husband noticed that he might be stuck so we got pretty close with our lights and checked him out. His little front paw did seem to be slightly under one of the bars. I lifted the cage handle and Husband used the hook stick to lift it slightly and replace it. Then we opened the doors again and gave him a slight push from the back. This time he gradually moved through the cage and went creeping into the nearby forest.

We thought we might be done moving skunks but we replaced the rocks again last night and they're moved again this morning. Maybe we'll catch skunk #3 tonight.

**2/21/10 update**

We ended up catching 6 skunks. Skunk #6 was a little smaller than the other ones and managed to spray me when I was trying to rearrange the pillowcase draped over the cage. That was pretty terrible. Everything I had on stunk, including my purse. After treatment with vinegar, bleach on the clothes that could take it, baking soda, dish soap, vodka, and many days on the line in the rain and sun , my best pair of jeans and my nice coat still have a faint smell clinging to them. (I did try tomato sauce and V8 on myself and wasn't that happy with the results).